Data room
The Data Room is a folder-based document repository used to store, organize, and share files related to an investor organization (and its sub-areas like Funds, Syndicates, SPVs, or portfolio companies—depending on where you open it). It helps teams keep key documents centralized, searchable, and easy to audit over time.
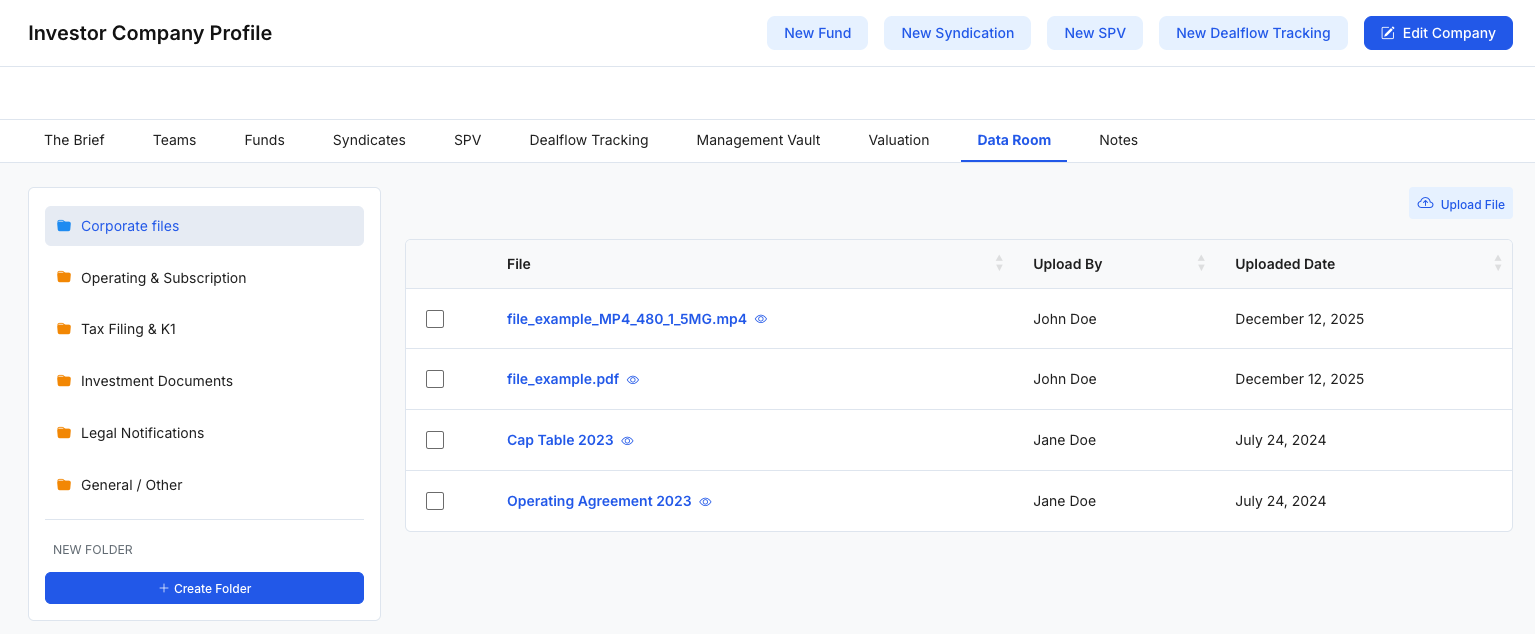
Figure 1 — Data Room overview (folders, files, upload)What the Data Room is used for
Use the Data Room to:
- Centralize documents (legal, tax, operating, investment, and internal materials)
- Organize files by folder/category for faster navigation
- Track uploads (who uploaded a file and when)
- Maintain consistency and auditability with a structured folder system
- Reduce scattered storage across email threads and shared drives
Folder names, actions, and visibility may vary based on your organization’s configuration and role permissions.
Page layout (at a glance)
1) Folder navigation (left panel)
The left panel shows a folder tree. You’ll typically see:
- Standard folders (e.g., Corporate Files, Operating & Subscription, Tax Filing & K1, Investment Documents, Legal Notifications, General / Other)
- Custom folders created by your team
Use the folder list to filter the file table to a specific category.
Create Folder: Use Create Folder (bottom of the panel) to add a new folder.
2) File table (main panel)
The main panel lists files inside the selected folder. Common columns include:
- File (clickable filename)
- Upload By
- Uploaded Date
- A checkbox per row for bulk actions (if enabled)
This view is meant for quickly scanning what’s available and confirming who uploaded what and when.
3) Upload action (top right)
- Upload File opens the upload flow for adding documents to the currently selected folder.
Upload Files modal (add multiple files or links)
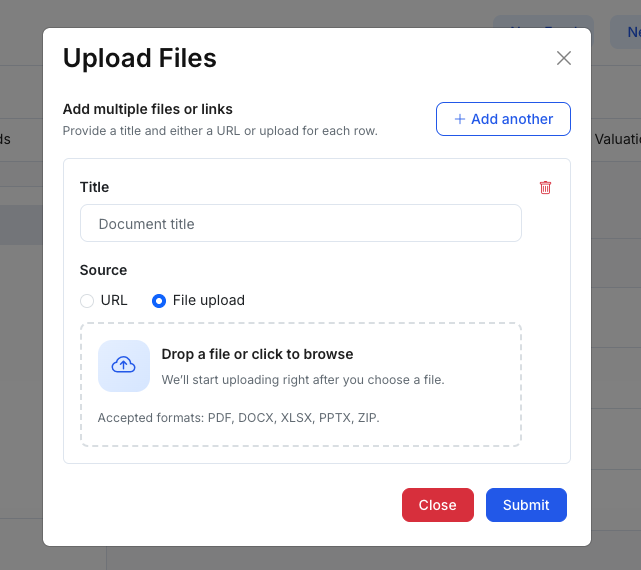
Click Upload File to open the Upload Files modal. This modal supports adding multiple items in one submission.
Add multiple rows
- Click + Add another to add more upload rows.
- Use the trash icon on a row to remove it.
Per-row fields
Each row includes:
1) Title
- Enter a descriptive document title (recommended for easier scanning later).
2) Source
Choose how you want to attach the document:
- File upload: Upload a file from your computer.
- Drag & drop a file or click the dropzone to browse.
- Typical accepted formats include: PDF, DOCX, XLSX, PPTX, ZIP (as shown in the modal).
- URL: Save a link instead of uploading a file.
- Enter a Document URL for the resource (e.g., a hosted document link).
In some configurations, uploads may begin immediately after selecting a file (per the helper text in the modal).
Actions
- Close: exits the modal without submitting.
- Submit: saves/uploads all rows added in the modal.
Suggested workflow (simple)
- Select the correct folder in the left panel (Corporate / Tax / Legal / Investment, etc.).
- Click Upload File.
- Add a Title, then choose File upload or URL for each row.
- Use + Add another to attach multiple documents at once.
- Click Submit, then confirm the files appear in the table with the correct uploader and date.